
This section is a general overview that omits some technical minutia that can be found in more in-depth sections further down.
> General
Our primary menu (“MainMenu.unity”) consists of a collection of objects that are designed to be activated in the hierarchy whenever the player needs to access them. Most are set to open on top of their last menu of origin. Nearly all of the menu pages have their own overarching animations to animate in, wait, and out, but some child objects, like like Buttons or the Game SaveSlot Buttons, have their own special animations as well, many of which fire simultaneously with its parent’s animations. Sounds complicated but I promise it’s pretty simple.
2. Selection Audio: “MenuSystem_Main_PrimaryAccept_Minor.wav”
3. Cancel/Back-out Audio: “menu_no1.wav”
> General Layout List
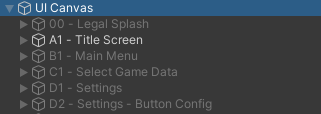
All UI menu objects can be found under the parent canvas object called “UI Canvas”. Below, I’ve listed out each object and explain generally what is does.
So generally..
… all of the UI assets listed below collectively make up the “Main Menu” and they’re layered so they can just open up on top of each other (again, generally), with the earliest UI elements starting at the beginning of the hierarchy with subsequent elements layered right smack dab on top of them.
There are some nuances here and there but that’s basically how it works.
So Legal Splash activates first, then “Title Screen”, then “Main Menu”. From there, everything else are sub-menus chosen from the Main Menu (“Select Game Data” and “Settings”). Lastly, the “Button Config” menu is a sub-menu of “Settings” so when it opens, it does so on top of the “Settings” menu.
The following list generally explains a little more detail on the sequence of events that should occur when the “MainMenu.unity” scene is accessed.
1. “00 – Legal Splash”
These are initial company logos, health warnings, and any other various legal splash screens the player needs to acknowledge before we officially reach the title screen. We’ll need the player to thumb through these when “MainMenu.unity” scene first opens. (More info in SECTION IV – Legal Splash)
When this completes, the entire assembly can fully deactivate so we can then move on to the next asset(s).
2. “A1 – Title Screen” & “World: Title Animation”
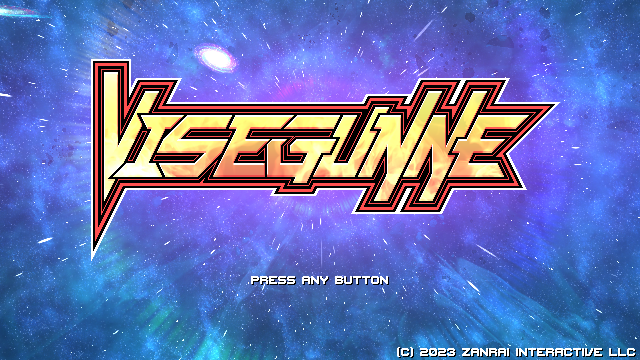
After the legal splash screens are finished, we deactivate it and then activate two new assets. First is the UI asset called “A1 – Title Screen”. This UI asset flashes the words “Press Any Button”. Additionally, underneath this UI object, we also activate “World: Title Animation” (the only non-UI object in the hierarchy we’re using). This world/non-UI asset includes both the title logo and a background. This logo animation is quite complex and necessitated being in world space to ensure some FX work correctly. The “World: Title Animation” object should complete its entire animation sequence before we allow the player to “Press Any Button” to proceed. By the end of this animation, the player will be looking at the VISEGUNNE logo with a flashing “Press Any Button” prompt below it. (More info in SECTION V – Title Screen & World: Title Animation)
3. “B1 – Main Menu”
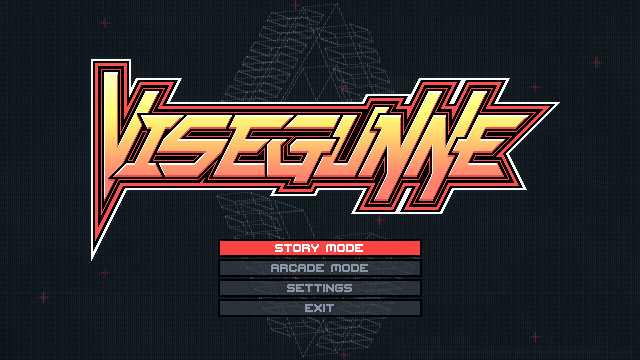
Once a button is pressed from the initial game logo, we proceed to activate the actual meat of the main menu objects within the “UI Canvas” parent. We proceed to activate “B1 – Main Menu”. Once this menu’s “In” animation completes, the player can choose whether to start story mode, arcade mode (an unlockable, ignore this for now), go to settings, or quit the game. (More info in SECTION VI – Main Menu)
4-1. “C1 – Select Game Data”
From the previous “A1 – Title Screen” menu, if the player chooses “Story Mode” then we activate “C1 – Select Game Data”, which is our save slot selection menu. Once this menu’s “In” animation completes, the player can select the game data slot they wish to use. Choosing data here will trigger an “Out” animation and then the “MainMenu.unity” scene can close and start the game. Each large savedata button, when highlighted (via that button’s animator component), slides more information out that shows the player’s in-game progress. (More info in SECTION VII – Select Game Data)
4-2a. “D1 – Settings”
From the previous “A1 – Title Screen” menu, if the player decides instead to choose “Settings” then we activate “D1 – Settings” on top, which has a collection of game settings the player can adjust. If the player closes this menu, they are returned back to “B1 – Main Menu” which should still be hidden underneath. Additionally, the player can also choose to customize their key bindings by opening a special sub-menu called “D2 – Settings – Button Config”. (More info in SECTION VIII – Settings)
4-2b. “D2 – Settings – Button Config”
From “D1 – Settings”, if the player chooses to adjust their button configuration, this is the menu that will be activated on top, while the previous “Settings” menu is hidden below. Here the player can change their key configuration. The player must close this menu out, which will return them back to the “D1 – Settings” menu. (More info in SECTION IX – Settings – Button Config)
In this section I will describe all the types of buttons we have.
We basically use the same button types in all menus (with a few exceptions). All buttons can be chosen with our main CONFIRM key (keyboard default “J”).
> 1. STANDARD BUTTONS

Most buttons are simply standard buttons that you just press to trigger something.
1a. Highlight
![]()
When these standard buttons are highlighted, we show this with two changes to the button. First, we activate the button item’s child object called “Selection”. Secondly, we need to change the “TXT” object’s color from gray (#8C95A4) to white (#FFFFFF).
1b. Activate Button
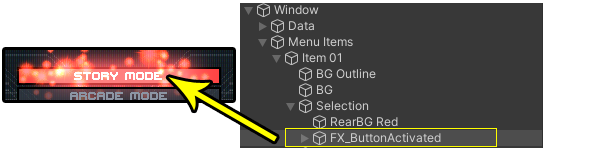
When a standard button is chosen/activated by pressing the CONFIRM key (keyboard default “J”), we then activate “FX_ButtonActivated” which is a child object of the “Selection” object. Once a button has been accessed by the player, we need to a slight delay to allow the activation FX to play out before we trigger the next menu item.
SPECIAL REQUEST: Layer “FX_ButtonActivated” on top of other things when its activated
Due to my setup, the “FX_ButtonActivated” particle system is often layered under other buttons, which looks weird sometimes! We should find a way to avoid this if possible so the FX is always layered on top of other buttons, if we can.
You can actually see this happening in the previous image above (The “Story Mode” particles are going under the “Arcade Mode” button). Ideally the FX should be sorted on top of all other buttons in each UI assembly when they are triggered just so it looks aesthetically pleasing.
> 2. SETTINGS PROPERTY BOX BUTTONS
These are special buttons that are variants of the standard button. Each standard button in our settings has a corresponding PROPERTY BOX BUTTON next to it. These boxes have an interactive means of changing properties (probably best to do a dropdown) from within the SETTINGS menu. You access a PROPERTY BOX by first selecting the Standard Button on the left. This will shift the highlight focus over to the PROPERTY BOX, noting that this box is the focus. Then, once the player makes their changes, pressing the CONFIRM key (keyboard default “J”) will lock in its currently selected setting while the CANCEL key (keyboard default “K”) will allow the player to back out and return to the standard button on the left. You can find more information on Settings Property Boxes in SECTION VIII (Settings) and SECTION IX (Settings – Button Config)
These boxes have two special functions:
2a. Property Box – “Dropdown”
![]()
When the player selects a setting to modify, the highlight cursor will move right to the corresponding property box they are modifying. For example, if within the SETTINGS menu, the game’s screen resolution is selected, the property box to the right will drop down and show a list of available resolutions the player can pick. The player can navigate this menu with the directional pad, up and down.
I wasn’t sure how to proceed with the dropdown menu, if you could set up the basics I can skin it, so sorry that’s not completed here. Upon pressing the selection button, the setting will be locked in and the highlight cursor should return to the standard button the left.
Highlights and Selection FX should work the same as standard buttons.
Note: We may need to modify how we highlight and color non-selected items on the dropdown functionality once we have this all set up.
2b. Property Box – “Volume Bar”
![]()
When the player selects a volume option from within the SETTINGS menu, the highlight cursor will move right to the corresponding property box they are modifying. In this box, the player can move the volume bar with their directional pad, left and right, to set the volume. Upon pressing the selection button, the volume setting will be locked in.
- Volume Bar Highlights
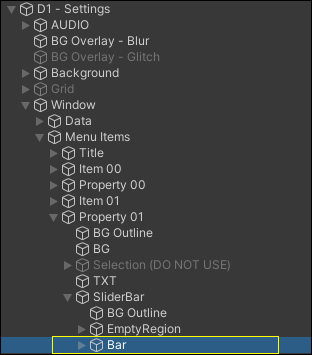
The Volume Bar -DOES NOT- use the “Selection” object in the same way normal buttons do. Instead, under that property box is a child object called “SliderBar”. Under “SliderBar” is a special “Selection” child object and -this- is what we use to highlight the volume bar when its values are being adjusted.
- Making Changes to the Volume Bar
After selecting the volume bar, its value is modified by moving the directional pad left and right. The “Bar” child object under the “SliderBar” should have its Width changed to correspond with the volume percentage.
../Window/Menu Items/Propery ##/SliderBar/Bar (this object)
Max Width: 344 pixels (100%, default setting)
Min Width: 2 pixels (0% volume)
Special Note on Canceling out of Property Boxes:
If the player presses the CANCEL key (keyboard default “k”) instead of the CONFIRM key (keyboard default “j”), this will stop any property changes from being committed and reset the property to whatever it’s previous setting was. This will also return the player back to the left column of buttons, highlighting the menu item that the property represented.
> 3. GAME SAVE SLOT BUTTONS

Our game save slots are basically just giant buttons except they they have some special animation features. There are a few different ways these buttons can display, and based on whether the saveslot has data on it or not, there are are two different types of highlight animations that can potentially play. Moreover, when these buttons are chosen, there are special animations and sounds that trigger (again, based on whether it has saved data or is doesn’t have save data on it). Additionally, these buttons also have a bunch of bits and bobs that display information on the player’s progress if saved data is found. (More info on this in SECTION VII)
> 4. Special Note on Button/Menu Flexibility
Some buttons will need to be omitted or added based on the platform the game is played on or if a hidden feature is an unlockable feature.
For example, consoles won’t need the “Exit” button on the Main Menu. This will likely apply to some Settings Menu options, too.
Also, “Arcade Mode” on the Main Menu is an unlockable feature, not accessible at the beginning.
Our standard buttons are generally placed with 20 pixels of Y distance between each other. So for the unlockable “Arcade Mode” button on the title screen, if it is not yet unlocked we need to make sure it’s (a) not visible abnd (b) we’ll also need to move up the “Settings” and “Exit” buttons by 20 pixels so they fill in the area where “Arcade Mode” should be.
Let me know what you think the best way to proceed here.
This section details technical info on the “00 – Legal Splash” GameObject.
> General Info
This asset includes health warnings, the Unity logo, company/publisher info, and other various introductory splash screens. It precedes the game’s actual title logo. We also need to make sure we leave a way to expand upon these logo splash screens just in case we have to add something later on.
Once all splash screens have gone through their animations, we can then proceed with activating the next phase, “A1 – Title Screen” (LINK: below in section V).

> Startup
This is the very first thing we display upon launching “MainMenu.unity”. It’ll play once the application is first started.
> Setup
This asset consists of a couple of animation states that the player is allowed to skip through once each animation state has completed their “In” animation.
All of these assets transition from an “In” state to a “Wait” state and then to an “Out” state.
The very first splash screen (the photosensitivity health warning) REQUIRES a button press to proceed to guarantee the player has seen it. Any buttons can be pressed here (though we probably should make exceptions to controller Dpads).
SPECIAL REQUEST: Show Health Warning Only Once Per Session
It would be really nice if the the “Photosensitivity Warning” slide was only visible the very first time the game is loaded, that is, the first time “MainMenu.unity” is loaded. On subsequent loads for this scene, I don’t think we really need it since we’ve already warned at-risk players, which could be annoying to non-photosensitive players since it requires input to skip.
Is there a better way to handle this?
All remaining splash screens will proceed automatically. For these later splash screens that will proceed automatically, the player can still skip to the next “Out” state with a button press once it has completed its “In” animation (and is currently in its “Wait” state).
It’s important that we leave room to expand upon these animations states in case we need additional stuff down the road (publisher’s logo, ratings, software acknowledgements, country requirements, or whatever else).
UI Animation Controller Location:
../Assets/Sprites/UI_Menu/Menus/Animation – Main Menu/LegalSplash
> Animation Parameters
I’ve included a “ButtonPressed” trigger parameter in the animator controller that allows for transitions between the animation states. I’m never quite sure what the best way is to set these up, so let me know if you’d prefer changes here.
> End of Phase
Once all animation states have completed “00 – Legal Splash” can safely be deactivated. It will never need to open up again for the duration of the scene.
This section details technical info on the “A1 – Title Screen” GameObject as well as the “World: Title Animation” background GameObject.
General Info
The assets for this phase consist of 2 items that activate at the same time:
- “A1 – Title Screen” (UI CANVAS OBJECT)
- “World: Title Animation” (IN WORLD SPACE)
The logo takes 4 seconds to go through its animation, upon which a UI prompt appears that tells the player to “Press Any Button”. Once the player has pressed a button we can then proceed with activating the next phase, “B1 – Main Menu” (LINK: below in section VI).
> Startup
These assets should be immediately activated after “00 – Legal Splash” completes its lineup of animations. The Title Screen UI and Logo (World) animations will start automatically upon activation.
> Setup
This is a bit of an unusual phase compared to the others because we activate two separate assets: a UI asset and a world space asset. The UI asset will do the normal “In” animation and finally reach a “Wait” state where we can allow the player to press a button to proceed.
For “A1 – Title Screen”
The UI Animation has two animation states: “In” and “Wait”. Importantly, there is NOT an “Out” state here. Because it shouldn’t be necessary.
For “World: Title Animation”
The world animation consists of two main child objects:
(1) the logo, and (2) a background (BG Scene 01).
Alternate Backgrounds (World Space)
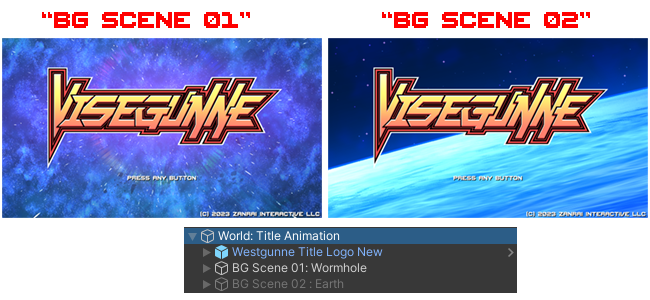
Within the “World: Title Animation” GameObject, is the game logo and a background. It would be super nice if we included support to change the background scenes (“BG Scene 01: Wormhole” and “BG Scene 02: Earth”) based on the player’s game progress. I’ve only included two right now, but being able to expand to potentially more would be nice to have. For example, if the player completes the game, the title screen background could change to “BG Scene 02”. Maybe we have another if they do something else more difficult. Totally low priority but it’d be nice to have as an extra.
Hopefully it should be as a simple as ensuring the desired “BG Scene” is activated at launch based on whether certain savefile conditions are met.
“BG Scene 01” should be activated by default, for now.
> End of Phase
Once the UI asset has reached the “Wait” state, the player can proceed by pressing a button which will open up “B1 – Main Menu”.
“A1 – Title Screen” and “World: Title Animation” should remain activated!
So once “B1 – Main Menu” is finally activated, we just leave these assets as they are because:
1. The player can back out of the “B1 – Main Menu” and return to the “Press Any Button” landing screen. We don’t want to play the logo animation again, so it’ll just sit there as the “Press Any Button” text flashes.
2. The “B1 – Main Menu” initial animation needs them in the background to look cool when its first opening up.
This section details technical info on the “B1 -Main Menu” GameObject.
General Info
This asset is the main menu that allows the player to either proceed with starting the game, entering the settings menu, or quitting the game.
The player has a few potential menu items to choose from here. Different animations will play on this UI assembly based on what menu item is chosen by the player.
1 – Story Mode
The default single player experience.
Proceeds to open up “C1 – Select Game Data”, LINK: below in section VII)
2 – Arcade Mode (Unlockable)
This should initially be hidden/locked. We can safely ignore the minutia on this one but this element can be unlocked after any gamesave has completed story mode once on any difficulty. The UI and animation transition elements for this mode have not yet been created. So let’s just leave a spot for it for now and we can return to it later.
3 – Settings
Various game settings, key configs, etc.
Opens up “D1 – Settings”, LINK: below in section III)
4 – Quit
Exits the program.
This item should be hidden on consoles.
5 – (special) PRESS CANCEL KEY (keyboard default “K”)
If the player presses the cancel key instead of choosing one of the menu options, then the menu will return back to the flashing “Press Any Button” screen (TITLE SCREEN & WORLD: TITLE ANIMATION).
> Startup
This menu will activate as soon as the player finally presses a button on the first title screen, “A1 – Title Screen”. It’s important to note that “A1 – Title Screen” should remain activated and left alone underneath “B1 – Main Menu” so that the player can return to the title screen if they so choose (by pressing the cancel key).
> Music
This menu basically controls when music begins playing. We should trigger the music to start here and gently fade in (maybe over 3-4 seconds) once this menu is activated. If the player backs out of the menu by pressing the CANCEL key (which will return back to the Title Screen), then the music should fade out (over 2-ish seconds). If the player again avances from the title screen back to the main menu, then the music should restart and fade back in (so we always freshly start the music over again upon opening this initial menu).
For now using either “Chat_Menu_01.ogg” or “Chat_Menu_05.ogg” would probably be decent candidates for the menu.
> Setup
There shouldn’t be a whole lot of setup beyond ensuring the correct menu animation is playing at the right times. Once the “MainMenu_In” animation completes, once the “wait” animation kicks in, then the player can make a selection.
Note on Transitioning Away From this Menu to Another Menu:
Once ANY menu item is selected from this menu, we keep this menu open/activated in the background, however, its animation “MainMenu_Wait” must transition to “MainMenu_Wait_OtherMenu” once a new menu has been chosen.
The reason for this, is the gameobject “Div Wireframe Prefab” (which is the giant wireframe spinning logo in the background) was actually causing some annoying slowdown in the editor for other UI elements when it remained active, so I decided to manually fade it out and deactivate it when the menu is not in view, just in case. To be fair, it looks cooler, too.
If any other sub-menu navigates BACK to the main menu, at that time we’ll need to modify the Main Menu’s animation once again so we can then transition away from “MainMenu_Wait_OtherMenu” and head to “MainMenu_Wait_OtherMenu_Return” so the wireframe background element can turn back on. Once that animation completes, the animator should automatically transition back to our regular “MainMenu_Wait” animation.
The parameter that controls this is a boolean called “OtherMenuOpen” (default false).
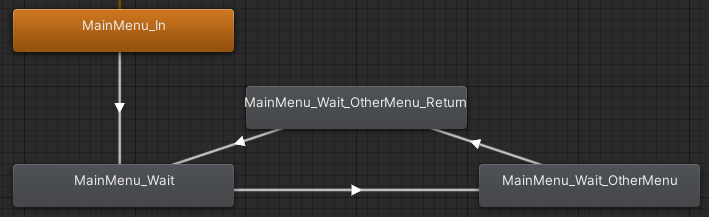
When selecting “Story Mode”, “Arcade Mode”, or “Settings” –
The animator on “B1 – Main Menu” should transition from “MainMenu_Wait” to “MainMenu_Wait_OtherMenu”. This is controlled by the boolean parameter “OtherMenuOpen” (default false) when it equals true. When it is set to false, the animation states will transition back to “MainMenu_Wait”.
When selecting “Exit” –
First we need to confirm that the player meant to exit. We first throw the player a Popup Confirmation Window called “B1 – Exit Game Confirmation” (located in the hierarchy at “UI Canvas/B1 – Main Menu/Confirmation Windows/B1 – Exit Game Confirmation”) to confirm they actually want to exit.
If the player confirms this window, then the animator on “B1 – Main Menu” should set its animation state to “MainMenu_Out_Quit”. Upon this animation finishing, then we can close the application.
When pressing the CANCEL key (keyboard default “k”) –
If the player is on the Main Menu and presses the cancel button, the animator on “B1 – Main Menu” should set its animation state to “MainMenu_BackOut”. The Main Menu should be deactivated once this animation completes, and this should return the player to the wormhole Title Screen with only the logo and “Press Any Button” flashing (remember: the “A1 – Title Screen” should already be activated underneath “B1 – Main Menu”, since it should never have been deactivated, so this animation’s transition should appear relatively seamless)
UI Animation Controller Location:
../Assets/Sprites/UI_Menu/Menus/Animation – Main Menu/MainMenu.controller
> Dynamic Menu Flexibility
This Menu has some items that may or may not be present, based on what the player has unlocked and based on what platform they’re playing on. I’m not sure how you want to proceed here so just let me know if I need to make a few variants in different states or whatever you think the best way to handle this is.

“Arcade Mode” is an unlockable that is not accessible at first, so we need to make sure to account for having the menu look aesthetically pleasing regardless of what items are in them.

Moreover, the “Exit” option needs to be able to be removed on console iterations as is shown in the example above.
> End of Phase
This menu should remain open in the background UNLESS the player has hit the cancel button (keyboard default “K”) to back out to the “A1 – Title Screen”.
If the “Exit” option was chosen, then this menu will play its animation “MainMenu_Out_Quit” and when this animation ends, the application will close.
This section details technical info on the “C1 – Select Game Data” GameObject.

> General Info
NOTE BEFORE STARTING THIS ONE:
You may want to first have the “MM – Movement Mode Menu” ready to go before tackling this menu since creating a save file first opens up the “Movement Mode Menu” as part of the save file creation procedure.
There’s more info about the “Movement Mode Menu” down below (LINK: Technical Info – SECTION X: “MM – Movement Mode Menu”)
Alright, so we’re on the “Select Game Data” menu. This is the menu we open when “Story Mode” is selected from the Main Menu. There are some special functions on this menu that don’t exist on other menus.
The player can choose a gamesave here, and each gamesave block displays information about the player’s current progress.
Gamesaves will need to be coded to recognize if data present, and if not, activate the gamesave assets “New Game” gameobject, to indicate that it can be saved to.
Additionally, the player can also choose to delete savedata here by selecting the “Erase Data File” button.
Once a gamefile is selected, it will proceed to the actual game.
> Startup
When this menu opens, it will play its “In” animation and stop on a “Wait” state, where the player can then make a selection. Based on the player’s actions and whether or not a gamesave is detected in a given slot, different things occur.
1. New Game – If DATA is not detected

Each gamesave will need to detect if data is present. If there is not data present, we activate the “New Game” gameobject inside each respective “Save Slot” object. This will make the save slot prominently display that the save is a “New Game” with no data saved in it.

2. Previous Save Data Detected –
If save data is detected we need to make sure we relay information about the save on the “Save Slot” prefab object. There are a bunch of assets that relay information and I’ll do my best to list them here:
Before we start, I just want to note. there are a few different panels that show information on this asset. “Box Left” corresponds to the left panel with the big number in it (and robot avatar). “Box Middle” is the center rectangle, and “Box Right” is a hidden panel that slides out with more information when savedata is detected. If you have any question about this setup, please contact me.
LEFT BOX
In the image below, the left box has our robot’s avatar in it and this should be palette swapped to the player’s current color palette. There are two images that cycle in the left box.
MIDDLE BOX
In the middle box there’s a line that says “NEXT: PROLOGUE” which a descriptor of the current phase (and task) the player has next. We should probably tie these to the phase # and just display text based on that. Still in the middle box, to the right is the date the file was last accessed. Additionally, there’s another little tiny robot in this box that should have its palettes swapped to match the currently equipped paint kit.
RIGHT BOX
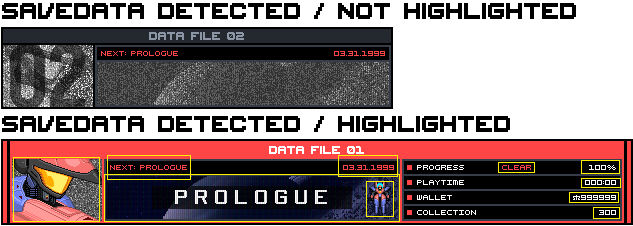
Lastly, this box also has an image that we need to activate that corresponds to the current stage the player is on. In the box to the right, we have a bunch of information (progress, a CLEAR label finished games, playtime, wallet, and collection number). It’s important for me to noet that the right box’s information is hidden until the Save Slot button is highlighted. When it is not highlighted the right box with all its data is hidden and the image gets static over it.
Also, just want to note, when these files are -not- highlighted, the middle box’s information IS still visible… slightly anyway. You can see the “NEXT: PROLOGUE”, the last time the file was accessed, as well as an image of the level covered in static.
A. BOX RIGHT / Progress
“../Save Slot ## (Prefab)/Window/Box Right/Box Inner/Progress Assembly/TXT_Progress/”
01. Progress Percentage
Modified Value: “TXT_ProgressValue”
This is the overall progress percentage through the game. Each completing each level at every difficulty and collecting all the collectibles contribute to this value. We’ll need to determine the actual percentages at some point.
02. Clear
Activate “TXT_Clear”
This is a simple GameObject called “TXT_Clear” that we activate when the player clears the final mission on any difficulty.
B. BOX RIGHT / Playtime
“../Save Slot ## (Prefab)/Window/Box Right/Box Inner/Playtime Assembly”
03. Playtime
Modified Value: “TXT_PlaytimeValue”
This is the time this gamesave has been opened. We’ll need to log all time a gamesave has been open.
C. BOX RIGHT / Wallet
“../Save Slot ## (Prefab)/Window/Box right/Box Inner/Wallet Assembly”
04. Wallet Amount
Modified Value: “TXT_WalletValue”
This is how much cash the player currently has on hand.
D. BOX RIGHT / Collection
“../Save Slot ## (Prefab)/Window/Box Right/Box Inner/Collection Assembly”
5. Collection Number
Modified Value: “TXT_CollectionValue”
This is the number of weapons, paint kits, and mods the player has collected. For now, I’m just adding them all together.
E. BOX MIDDLE / Next Task
“../Save Slot ## (Prefab)/Window/Box Middle/Info – Top Bar/TXT_NextTask”
6. Next Task
Modified Value: “TXT_NextTask”
For this text, we’ll check the gamesave’s current phase numbers and provide a description that corresponds with that phase value.
F. BOX MIDDLE / Last Access Day
“../Save Slot ## (Prefab)/Window/Box Middle/Info – Top Bar/TXT_LastAccessDay”
7. Last Access Day
Modified Value: “TXT_LastAccessDay”
For this text, we’ll check the gamesave’s current phase numbers and provide a description that corresponds with that phase value.
G. BOX MIDDLE / Level Slide Image
“../Save Slot ## (Prefab)/Window/Box Middle/Info – Main/LevelSlide/”
8. Level Slide Image
Activate one of these GameObjects here, based on the gamesave’s current phase value.
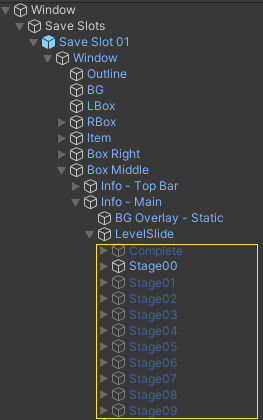
We simply activate one of these GameObjects based on player’s current phase value.
H. BOX MIDDLE / Tiny Robot Sprite
“../Save Slot ## (Prefab)/Window/Box Middle/Info – Main/HV Small/”
9. Tiny Robot Sprite
This needs to match the player’s currently equipped palette
I. BOX LEFT / HV Pic 01
“../Save Slot ## (Prefab)/Window/Box Left/HV Pic 01″
10. HV Pic 01
This needs to match the player’s currently equipped palette.
11. HV Pic 02
This is another robot sprite. It also needs to match the player’s currently equipped palette.
> Setup and Highlighting Animations
So outside of making sure data is being shown on the Save Slot buttons themselves, how we highlight these objects is a little different depending on whether the Save Slot has data or not. In the GIF below, I demonstrate how New Game expands versus how a gamesave with data on it expands when its highlighted. It’s a little different and requires separate animations being triggered. There’s also a separate highlight animation for when we want to erase data, but more on that further down.
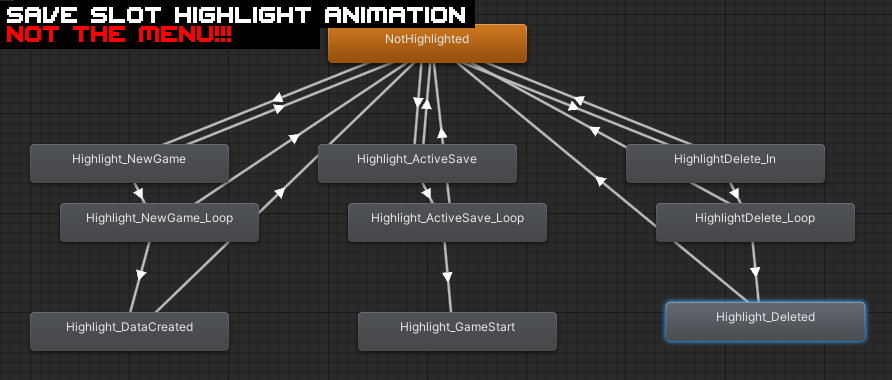
This is the animator controller for the Save Slot Prefab, and not “C1 – Select Game Data” which has its own separate animator. So this controller is used exclusively for manipulating the Save Slot buttons.
UI Animation Controller Location:
../Assets/Sprites/UI_Menu/Menus/Animation – Main Menu/SelectGameData.controller
> Basic Functionalities
A. Choosing a New Game
We are going to select an empty save slot to start a new game. The “Save Slot” prefab is highlighted with its animation state “Highlight_NewGame” by activating the boolean parameter “HighlightNewGame” (default false).
Once the player selects the “Save Slot”, before a new game is actually created, we need the player to first select their desired Movement Mode. This will open the “MM – Movement Mode Menu” (LINK BELOW, Section X, I have not included the details of that procedure in this section, so please check out Section X for more details how these interact). Once the player selects their desired movement mode, the Movement Mode Menu will open one its confirmation windows, and then close out, returning the player back to the “Select Game Data” menu.
Once the player has returned to the “Select Game Data” menu, a Popup Confirmation Window “C1 – Data Created” (located in the hierarchy at “UI Canvas/C1 – Select Game Data/Confirmation Windows/C1 – Data Created”) will open confirming data was created. This is where we should actually create the save file. Simultaneously, as the confirmation window opens, we also need to deactivate the “New Game” object on the respective “Save Slot” prefab object (since this save slot now has data saved to it). Additionally, we’ll need assigning basic starting information to the save slot’s various objects that show the savefile’s information since it’s now an active save file (for the “Box Right” object: play time is “000:00”, wallet is “0”, collection is “0”, progress is “00%”. For the “Box Middle” object: the next task should be set to its phase tag for phase=0000, we also set the current date, and we also need to enable “LevelSlide/Stage00”).
We now have data in that save slot. Once the Confirmation Window is confirmed, we will then return the player to the “Select Game Data” menu so they can now select their freshly created save data. The file should now be highlighted with the animation “Highlight_ActiveSave” since we will have set the boolean parameter “HighlightActiveSave” to true. This animation not only highlights the save slot, but also expands the “Box Right” object which has a bunch of save file info/stats tucked away (play time, wallet, progress, collection).
B. Choosing an Active Save
We are going to now select a game with active save data. By navigating to the correct save file, it will be highlighted with the animation “Highlight_ActiveSave” using the boolean parameter “HighlightActiveSave”.
Upon press the CONFIRM button (keyboard default “J”), the boolean animation parameter “GameStart” will be set true, and the save slot’s animation will immediately transition to “Highlight_GameStart”. There should be a slight delay to ensure it’s visually clear the slot has been selected.
Then, we will open a Popup Confirmation Window “C1 – Data Created” (located in the hierarchy at “UI Canvas/C1 – Select Game Data/Confirmation Windows/C1 – Confirm Selection”) will open asking for a final confirmation before we enter the game.
Once the player has confirmed the confirmation window. Once the window exits out, the parent menu, “C1 – Select Game Data”, will then change its animation parameter boolean to either “Slot1Chosen” = true, Slot2Chosen”, or “Slot3Chosen” depending on which slot was selected by the player. Once the ensuing animation has completed, the screen will fade to black and we can begin the game.
At any time, the player can back out and it will return the player to a normal highlighted selection.
C. Deleting a Save

So we have a save file that we want to delete. By navigating to the “Erase Date File” button and selecting it, it will force the cursor back to “Save Slot 01” but use a new highlight animation on the save slot using the save slot’s animator boolean parameter “HighlightDelete”. In this phase, the player should ONLY be able to highlight Save Slots. Whenever a save slot is highlighted, we use its “HighlightDelete” boolean to make sure its obvious what is being targeted for deletion.
When a save slot is navigated away from, we just set all Save Slot animator booleans back to false, which should return the Save Slot back to its non-highlighted state.
Upon finally selecting a save slot for deletion, the player will receive a Popup Confirmation Window called “C1 – Delete file” (located in the hierarchy at “UI Canvas/C1 – Select Game Data/Confirmation Windows/C1 – Delete File”). If the player confirms this window, the file should be cleared, but we also play an animation on the “Save Slot” by flipping a boolean on called “DataDeleted”. When this occurs, we need to immediately reactivate the “New Game” objects on the Save Slot because a deletion animation will start playing that expects it to be active once its finishes. Once the animation has ended, the animation will conclude by transitioning to highlight a new game. We then throw the player one more Popup Confirmation Window called “C1 – Data Deleted” (located in the hierarchy at “UI Canvas/C1 – Select Game Data/Confirmation Windows/C1 – Data Deleted”) just to confirm the data has in fact been deleted. After they confirm this window, we return control to the player.
D. Backing Out and Canceling to the Previous Menu
If the player hits the CANCEL key (keyboard default “k”) OR if the player chooses the standard button at the bottom of the menu that says “Back to Main Menu”, the “C1 – Select Game Data” object will set its animation to “SelectGameData_BackOut”. Because the main menu is still active underneath this particular menu, this menu will gracefully transition back to the Main Menu. Once this the Game Save menu’s “OUT” animation has completed, it can be deactivated.
E. Special Note on Canceling out of Property Boxes
If the player has chosen to Delete/Erase Data (and is in the middle of highlighting data to delete) but then presses the CANCEL key (keyboard default “k”), this will back out of the deletion selection phase and return the player back to the “Erase Data File” button, highlighting it instead.
> End of Phase
If a gamesave data file was selected and the player proceeds to start a game, then no further action is needed.
If the player backs out of this menu to return back to the Main Menu, then we change the selected animation on “C1 – Select Game Data” to “SelectGameData_BackOut” in its animator controller. Once this animation completes, “C1 – Select Game Data” can be safely deactivated.
This section details technical info on the “D1 – Settings” GameObject.
> General Info
IMPORTANT NOTE:
There may be settings I forgot to include or settings I included that aren’t feasible! Let me know if you see anything glaringly wrong!Also: the LANGUAGE option may or may not be included, but I’m leaving a spot for it at the top. We can tackle the nitty-gritty on that later.
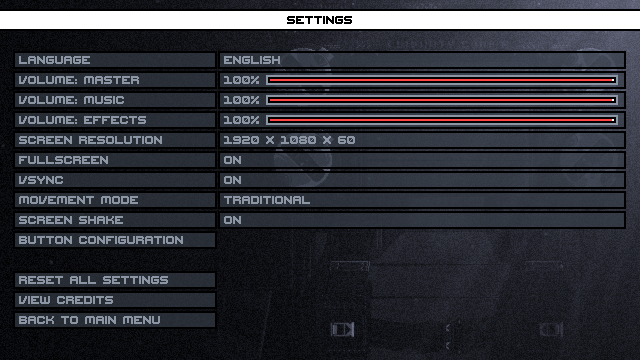
This is the settings menu. The player navigates the left column of buttons, and when one is selected, the right “Property Box Buttons” will be highlighted, allowing the player to change their properties. More info on all of that back in section III, UI Button Types & Functions.
The player can also advance to a sub-menu by choosing the “BUTTON CONFIGURATION” button, which will open up “D2 – Settings – Button Config” (LINK: below in section IX).
Once we’re done, the player can return back to the main menu by choosing the “BACK TO MAIN MENU” button OR using the CANCEL key (keyboard default “k”) when a main option is selected.
> Setup
Are we missing any important settings?
Let me know if you catch any settings should include here.
Most items in the Settings menu are probably fairly self-explanatory, just enabling/disabling or modifying certain functions.
However, there are a few weird options that require special functions beyond a simple dropdown menu or volume bar change, that may or may not have additional little nuances:
Screen Resolution:
This option is basic setting but we have a few confirmation windows to go with it.
When a screen resolution is modified, we open the Popup Confirmation Window called “D1 – Display Resolution Confirmation”. This window will need to wait for 10 seconds before reverting back to the previous setting.
If the player chooses to confirm this window they will be given another final confirmation prompt “D1 – Display Resolution Confirmed”. Conversely, if the previous window was canceled or 10 seconds passed, we open up a different confirmation window, “D1 – Display Resolution Reverted”.
Movement Mode:
This should open up the “Movement Mode Select” window and not a dropdown, because I want to make sure we explain to the player what each movement mode type actually does, and what each is best suited for.
Button Configuration:
This button opens a special sub-menu called “D2 – Settings – Button Config”, more info on that down below in section IX.
Reset All Settings:
This is just a single standard button. Choosing it opens a Popup Confirmation Window called “D1 – Reset All Settings Confirmation”. If the player confirms this window, ALL settings including button configurations will be reset to their default settings. We will also need to throw one last Popup Confirmation Window to prompt the player that this has occurred called “D1 – Reset All Settings Done”.
Credits:
This should run the credits. I do not have this implemented yet, but it will probably be just a separate sub-menu UI asset animated to scroll text, so we’ll need to keep room for it in the very least.
UI Animation Controller Location:
../Assets/Sprites/UI_Menu/Menus/Animation – Main Menu/Settings.controller
> End of Phase
The player can return back to the main menu by choosing the “BACK TO MAIN MENU” button OR using the CANCEL key (keyboard default “k”) when a main option is selected. This should trigger the animation “Settings_Out”. Once this animation completes, “D1 – Settings” can be safely deactivated.
This section details technical info on the “D2 – Settings – Button Config” GameObject.
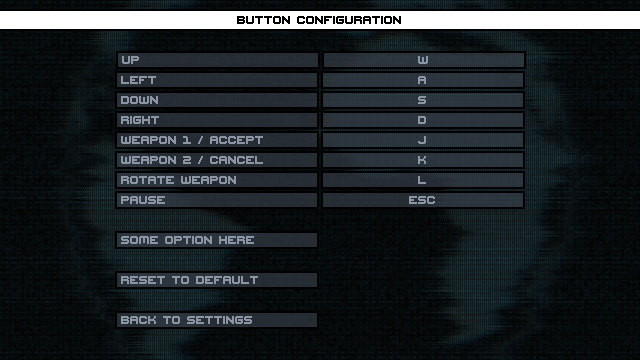
> General Info
This is very similar to the original Settings menu except each standard button on the left can be chosen to change its key binding. Upon choosing a basic control function on the left, the highlight will jump to the right where the player will need to input the key they’d prefer to use for that function.
Once the player is done and is not highlighting anything on the right columns, we can back out by pressing CANCEL (keyboard default “k”) OR selecting the “Back to Settings” button at the bottom of the menu.
> Setup
QUESTION:
Before we start here, I’ve currently only allowed one set of key bindings. Some games allow a secondary slate of bindings, but I’m not sure 100% sure on it. It could be useful for people using controllers, but I’m not sure.
Do controllers need their own separate window to define keys?
Do you have any thoughts on this?
The only weird setup here is when the player selects a button on the left column, it should move the highlight to the box on the right as we wait for the player to define the new key.
When this happens we’ll also need to change the text on the right property box’s text object to say: << PRESS BUTTON >>
Reset To Default:
This is just a single standard button. Choosing it opens a Popup Confirmation Window called “D2 – Reset Buttons Confirmation”. If the player confirms this window, all key bindings will return to their default settings. We will also need to throw one last Popup Confirmation Window to prompt the player that this has occurred called “D2 – Reset Buttons Done”.
UI Animation Controller Location:
../Assets/Sprites/UI_Menu/Menus/Animation – Main Menu/ButtonConfig.controller
> End of Phase
The player can return back to the initial Settings menu by choosing the “BACK TO Settings” button OR using the CANCEL key (keyboard default “k”) when a main option is highlight on the left column. This should trigger the animation “ButtonConfig_Out”. Once this animation completes, “D2 – Settings – Button Config” can be safely deactivated, which will then return the player to the regular Settings menu.
This section details technical info on the “MM – Movement Mode Menu” GameObject.
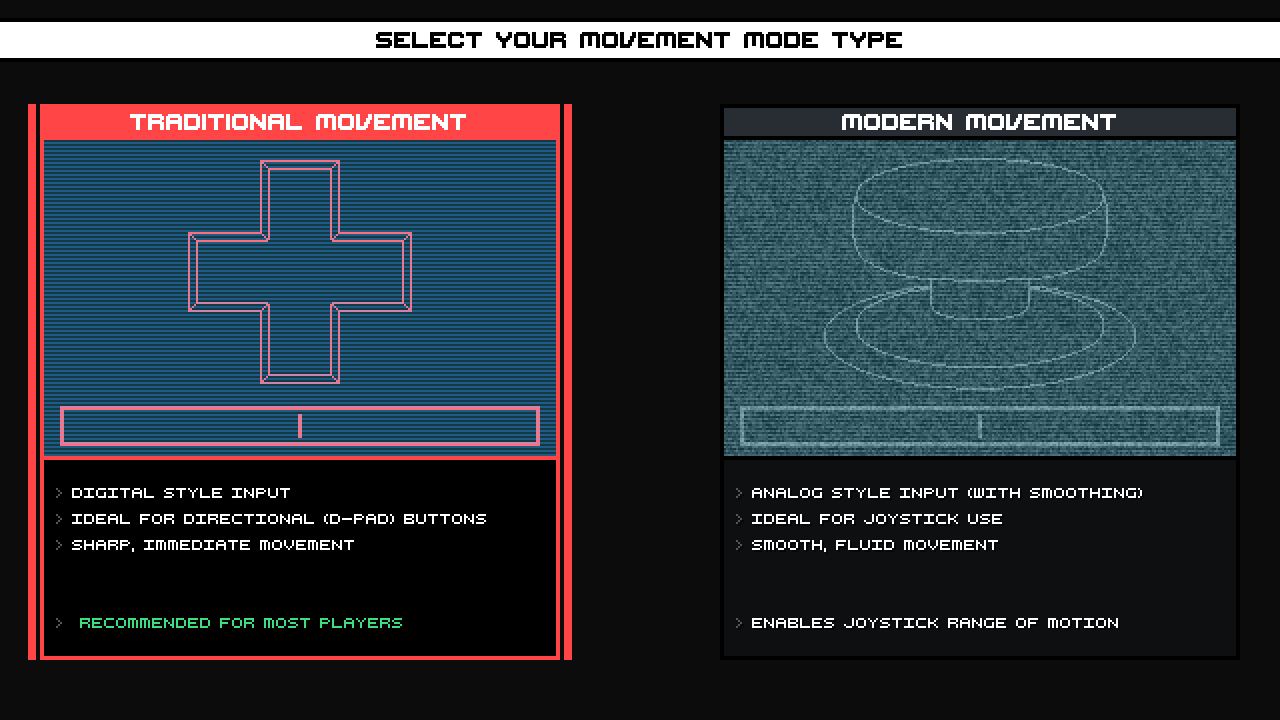
> General Info
This menu lets the player choose one of our two movement modes (Traditional or Modern). I’ve set it up to have its own menu so we can relay a little more information about each mode and to try to visually explain digital versus analog (or smoothed) movement types. Changes made here are “global” for the entire application: they are not saved uniquely per gamesave file. I went with this route because it just seems clearer.
The player can access this menu from two different places in our menu system: (A) after choosing a new game from the “Save Slot Menu” or (B) after choosing the “Movement Mode” button from the “Settings” menu.
Note: When the application is first loaded up and the player has not yet created their own save data, the game’s default setting for movement mode should be set to “Traditional” by default.
This probably doesn’t really matter, but because the “Movement Mode” is set globally for the entire application, and because the player can theoretically modify this setting within the Settings Menu without ever having created save data, we need to have a default state even though the player has to pick what they want during the savefile creation procedure. Anyway, super minor but just noting that here.
> Access Procedure
This menu is opened from two different places, (A) during the procedure of selecting a New game from the Save Slot Menu and (B) from the Settings Menu.
A. ACCESSED WHILE CREATING A NEW GAME (SAVE SLOT MENU)
1. If the player chooses a new game from the Save Slot Menu, after the Save Slot button has been set to its “Chosen” animation (AND before we officially create a new game file) we’ll first will open the Movement Mode Menu.
2. Once the player has chosen their desired setting, a Save Slot Menu Confirmation Window “M1 – Initial Setup Movement Mode Confirmed” opens to confirm the selection was made.
3. Upon closing this confirmation window, the Movement Mode Menu will close.
4. From here, we will have returned back to the Save Slot Menu where we will open one last Save Slot Menu Confirmation Window “C1 – Data Created” will open confirming the Save File was created. It is here where we will officially create the player’s save file.
5. Once that confirmation window is closed the Save Slot Menu will close. With all these menus closed, this begins the game.
Canceling out – The player can back out of the menu by pressing CANCEL (keyboard default “k”). This will play the Movement Mode Menu’s out animation, canceling the creation of a new save game file, returning the player back to the Save Game Menu with the save slot they had previously chosen, highlighted as a “New Game”. Again, no save file should be created if the player does not also confirm their movement mode.
B. ACCESSED FROM SETTINGS MENU
1. If the player presses the “Movement Mode” button from the Settings Menu, this will open the Movement Mode Menu. Unlike all our other buttons found in the Settings Menu, we will instead use this special Movement Mode Menu to explain what each type of movement style actually does.
2. Once the player has chosen their desired setting, the Movement Mode Menu will close and return the player back to the Settings Menu.
Canceling Out – The player can back out by pressing CANCEL (keyboard default “k”), which will cancel the creation of a new save game, returning the player to the Save Game Menu with save slot they had previously chosen, highlighted as a “New Game”.
Once the player has chosen one of the Movement Mode options, this menu will close, THEN the the game will begin. OR selecting the “Back to Settings” button at the bottom of the menu.
> Setup
Main Assembly:
This menu’s parent object has its standard In/Wait/Out animation states:
“MovementModeWindow_In”
“MovementMode_Wait”
“MovementMode_Out”
Button Assemblies:
The two large buttons have their own collection of animations as well.
Under “MM – Movement Mode Menu/Windows/” there are two buttons called “Window (Traditional)” and “Window (Modern)“.
They are set up with identical animation states and function similarly to all the other buttons we’ve created. When a button is highlighted we use the boolean parameter “Highlighted” = true to trigger the animation. If a button is highlighted and then selected by the player we activate the boolean parameter “Chosen” = true which will play an animation on the chosen button to visually demonstrate that it was selected. Also, for the button that the player DID NOT select, I’ve also included a boolean parameter called “NotChosen”, so once the player does select their desired movement mode, the one they didn’t select should have its animation parameter “NotChosen” set true so that a special animation can play on the undesired button that kind of fades it out (to further drive home the idea that it was rejected over the other choice). It’s simple, but kind of a weird setup; sorry about that.
And, lastly, you can safely ignore the animator on this menu’s “Window” object. I used this weirdly placed animation to ensure both buttons’ dpad and joystick animations play simultaneously, at precisely the same time. Figured I’d mention it here just in case it caused any confusion.